Lifetime Permanent QR Codes.
Pay Once & Use Forever.
Looking for a reliable one time qr code generator? Create Dynamic QR Codes at $49 each — they are Lifetime Editable QR Codes that never expire and need no subscription.
A genuine lifetime deal direct from the makers, with guaranteed support.
Relied upon for long-term digital assets. We build with longevity in mind, backed by a Service Continuity Guarantee.
Trusted by Innovative Brands Worldwide


Comprehensive Capability Matrix
A complete breakdown of our permanent QR infrastructure compared to traditional monthly subscription services.
*Comparison based on standard industry offerings for professional QR management as of 2026.
Dynamic, editable after printing.
One-time payment, lifetime validity.
Change where your QR code points anytime—links, PDFs, menus, vCards, product pages, SKUs, and long-term assets—without reprinting. One-time payment per code; no expiry, no subscription. Static (fixed) codes also available.
Short Links & URL
Point to product pages, SKUs, or any URL. Change the destination anytime—no reprint.
EditablePDF Document
Manuals, brochures, menus. Swap the PDF anytime; same code, updated content.
EditableImage Gallery
Product catalogs or portfolios. Add or remove images anytime without reprinting.
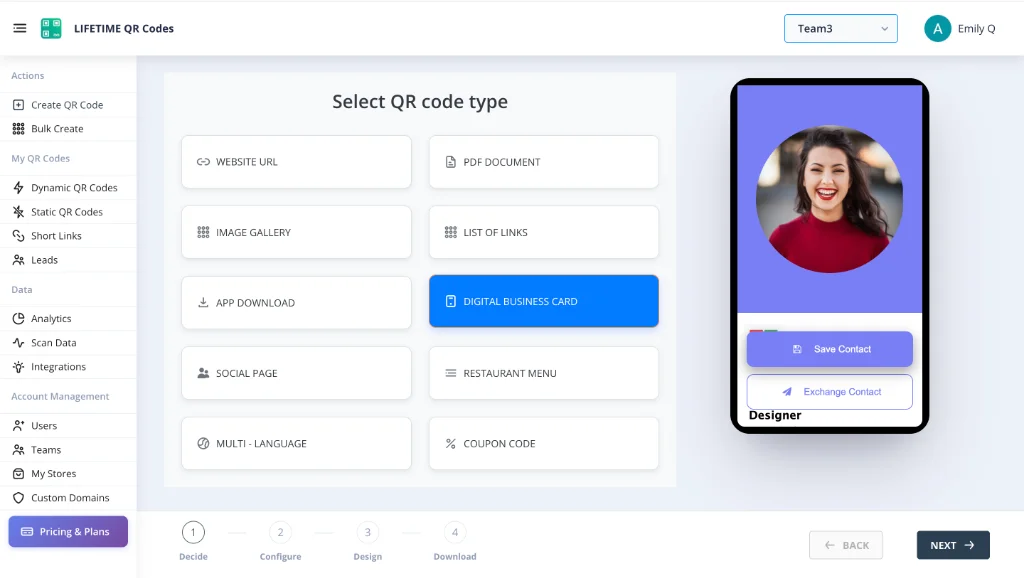
EditablevCard Plus
Digital business cards that save to contacts. Update your details anytime.
EditableRestaurant Menu
Digital menus with instant updates. Change prices and items; code stays on the table.
EditableApp Download
Redirect to App Store or Play Store. Update the target app link anytime.
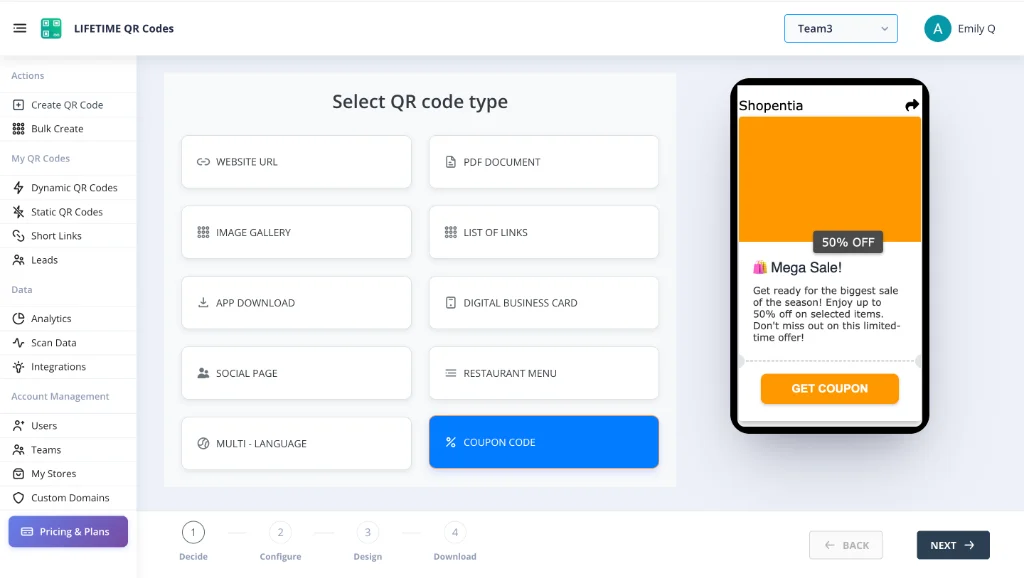
EditableCoupon Codes
Promotions with trackable scans. New offers anytime; same printed code.
EditableMulti-Language
Redirect by user language. Change destination per language anytime.
Why Dynamic?
Perfect for marketing. Update the destination URL at any time without changing the printed QR code. Track scan locations, device types, and real-time performance metrics.
Why Static?
Permanent and indestructible. Data is encoded directly into the pattern. These codes never expire, require no server redirection, and work flawlessly even offline.

Website URL
Redirect to any page. Update destination anytime without reprinting.
Digital Business Card
vCard that updates. Change your info, keep the same code.
PDF Document
Swap the PDF anytime. Same code on packaging, updated content.
Restaurant Menu
Update prices and items. QR stays on table, menu stays fresh.
App Download
Smart redirect to iOS or Android. One code, any app store.
Social Bio Page
Link-in-bio for all your social profiles. Update links anytime.
Image Gallery
Product catalog or portfolio. Add and remove images freely.
Coupon Code
Seasonal promotions. Same printed code, fresh offers each time.
Short Link
Branded short URLs with tracking. Change destination anytime.
Multi-Link Page
Multiple destinations from one code. Update the list anytime.
Examples of Permanent QR Codes
Most QR Codes Break When Payments Stop
Don't let this happen to you. When you print codes on packaging, signage, or business cards, you need them to last.
❌ Subscription Services
Stop paying → QR codes break → Your printed materials become useless.
❌ Free QR Generators
No guarantees. Companies shut down. Links redirect to ads.
✓ Lifetime QR Codes
Pay once for a one time use qr code. Own it forever. No subscriptions. No expiration.
The Nightmare ScenarioReal Stories from Frustrated Users
I printed 5,000 product labels and then realized the QR service wanted $35/month forever. If I stop paying, my labels die. I'm literally being held hostage.
— Small Business Owner
We used a 'free' generator for our wedding invites. The day before the wedding, the links redirected to ads unless we paid an upgrade fee. Nightmare.
— Frustrated User
The subscription price doubled after one year. I have 500 business cards in circulation so I have no choice but to pay the new rate.
— Marketing Director
I hit a 'scan limit' I didn't know existed. My menu QR codes stopped working in the middle of dinner service until I upgraded to the 'Pro' plan.
— Restaurant Manager
Tried to cancel my subscription but there was no button. Had to email support and wait 5 days while they kept charging me.
— Agency Founder
They claimed it was 'dynamic' but they wouldn't let me change the URL unless I paid for the Enterprise tier. Bait and switch.
— Tech Consultant
~$348/yr
Illustrative savings vs a ~$49/mo single-code SaaS tier
10,000+
Professionals choosing permanent QR over subscriptions
99.9%
Uptime target for redirect routing infrastructure
~73%
Lower year-one cost vs a $108/yr plan (($108−$49)/$108)
Subscription comparisons are illustrative—substitute your actual quote. Full methodology, ISO/FTC/Statista/Pew citations, and ROI tables: QR code statistics & research.
The Lifetime SolutionWhy Businesses Choose Permanent QR Codes
See what happens when you stop renting and start owning.
"I really like the way Lifetime QR Codes works. Finally owning our assets with a one-time payment is a game changer for our family business."
Infinite Family
Verified Customer
"Technical setup with Lifetime QR Codes was incredibly smooth. We have full control over our domains and the permanent QR code model is perfect for us."
Nordic Snus Co.
Verified Customer
"Thank you Lifetime QR Codes for everything. The ability to manage our team and create dynamic QR codes without recurring costs has been exactly what we needed."
Nikos C.
Verified Customer
"I appreciate how Lifetime QR Codes listens to feedback. It's rare to find a company that improves their permanent QR code tools based on what users actually ask for."
Alexander S.
Verified Customer
"Unlimited scans actually means unlimited. We used Lifetime QR Codes for a viral campaign with 50k scans and never got throttled."
Marketing Lead
High Volume User
"I had a question about vector formats. The Lifetime QR Codes support team got back to me instantly. Refreshing service."
Graphic Artist
Great Support
How Lifetime QR Codes Work
Create & Pay Once
Design your one time qr code. Pay a 1 time payment of $49 for an editable code. Static codes are free.
Stored Permanently
Your QR code is stored on infrastructure designed for long-term availability.
Works Indefinitely
Your code remains active even if you never log in again. No renewals needed.
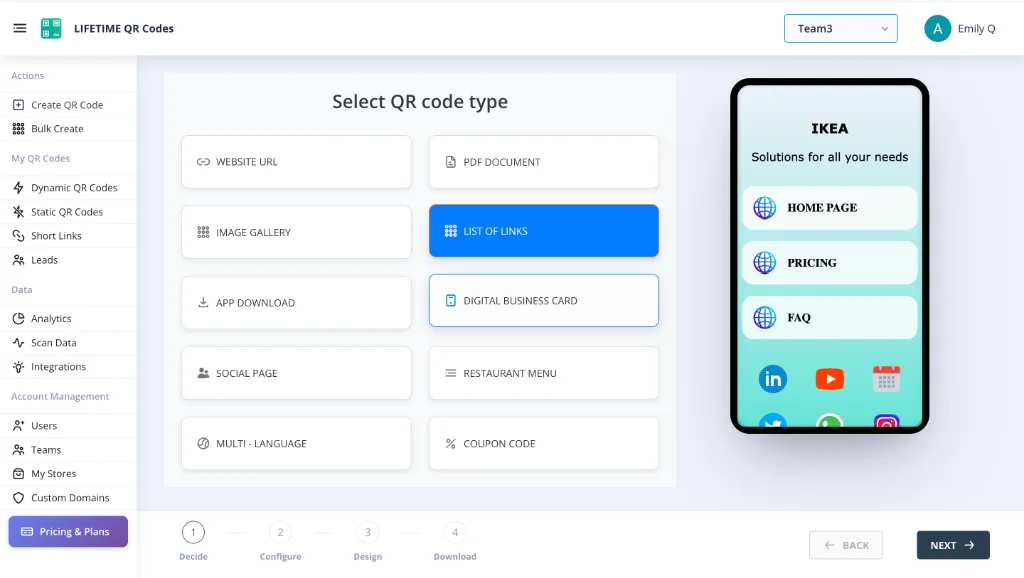
See the Platform In Action
Manage your permanent assets through an enterprise-grade dashboard designed for simplicity and power.
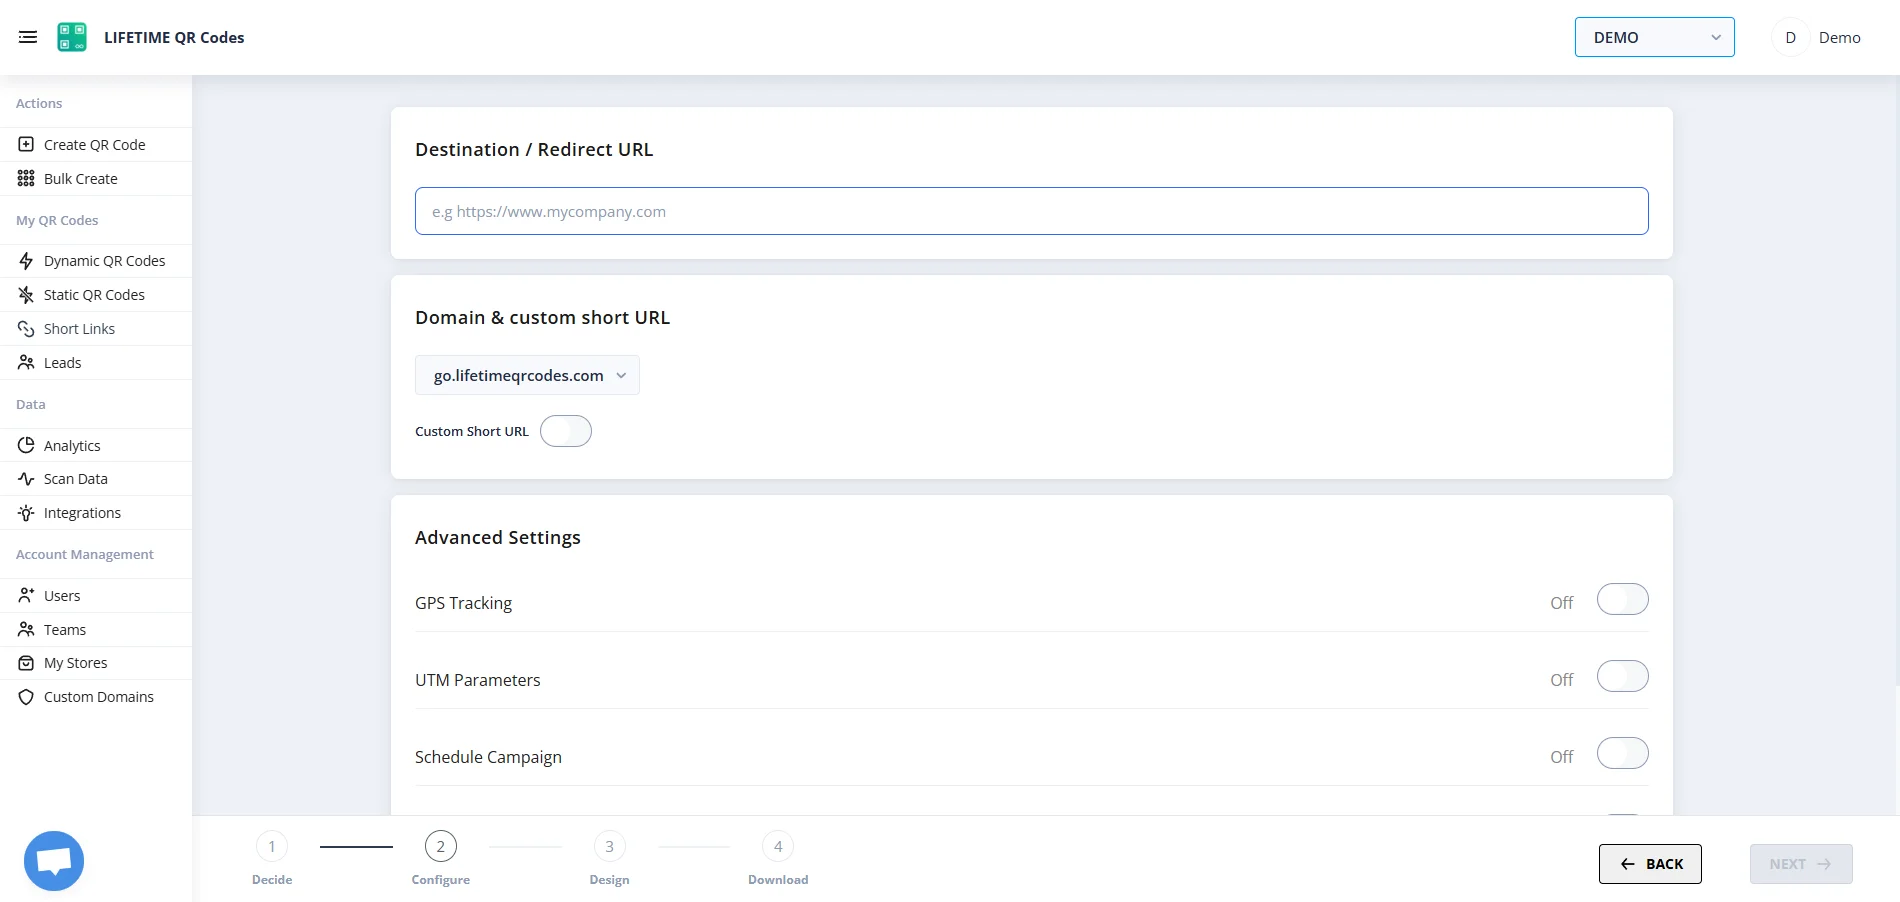
Dashboard: Edit QR Code Redirect
Printed QR Code
(Fixed Pixels)
Editable QR Codes.
Edit QR After Print.
Your brand rebrands. Your menu changes. Your website moves. With editable lifetime QR codes, you update in seconds—not weeks. No reprints. No waste. Same code works forever.
Edit Destination Post-Printing
Change your menu, catalog link, app store page, or company website on already printed cards or product packaging.
Static Pixels, Dynamic Paths
The physical visual pattern of the QR code remains 100% unchanged. Scanners won't experience any interruption during the swap.
One-Time Asset Ownership
Other generators take away your editing capabilities if you cancel your subscription. With Lifetime QR, edit your codes forever with a single payment.
Lifetime QR Codes Analytics
See scans, devices, and top links at a glance — no subscription required.
Total scans
12,407
+26% vs previous period
Unique visitors
8,291
Last 24h
412
Avg scans / QR
4
Peak
Wednesday 14:00–15:00
Last 7 days
Daily scans
By device
By OS
Top regions
Top QR codes
- Menu – Main3,124
- Business Card vCard2,891
- Product Page2,103
- Event RSVP1,842
- PDF – Brochure1,247
One-Time Pricing (1 Time Payment). No Subscriptions.
No hidden fees. Just pay once per QR code.
1 time payment. Permanent ownership.
Static QR codes (fixed URL) are always free. An editable one time use qr code generator plan costs $49 one-time per code.
Designed for Printed Materials That Last
Ideal for any use case where QR codes are printed on physical materials meant to remain in circulation for years. Transitioning from a standard upc e barcode generator or aztec code generator? Our permanent QR solutions offer more flexibility than a traditional codabar generator or codabar barcode generator.
Product Packaging
Labels that outlast inventory cycles
Signage & Displays
Physical signs in retail or public spaces
Business Cards
Networking materials that last years
Healthcare
Compliance labels and patient info
Logistics
Asset tracking and shipping labels
Events
Promotional materials with lasting impact
Permanent QR Solutions for Every Industry
Explore how specific industries use permanent, non-expiring QR codes to lock in their digital assets forever.
Our Commitment to You
No Subscription Trap
Your codes work indefinitely. We do not hold QR codes hostage for recurring payments.
Real Human Help
24/7 live chat with real experts. Honest guidance—if you don't need a paid code, we'll tell you.
Try Before You Bulk
We recommend starting with one code to test the platform. Buy volume later when you're 100% comfortable.
Established Company
A real company with real infrastructure. Built for long-term stability and performance.
Why lifetime QR codes sit on a growing, regulated channel
U.S. smartphone users continue to adopt QR scanning as a routine behavior. Statista tracks QR scanner usage among smartphone users (survey waves and percentages update over time—see their latest chart for exact figures).
Because QR codes bridge print and the web, they are also used in phishing and social engineering. Statista summarizes QR-related phishing exposure in organizations, and the FTC explains how scammers misuse QR codes so consumers can spot unsafe scans.
Mobile penetration underpins every QR campaign: Pew Research Center's mobile fact sheet outlines how broadly Americans rely on smartphones—critical when you print codes on menus, signs, cards, or packaging.
The black-and-white pattern itself is standardized: ISO/IEC 18004 defines the QR Code symbology. That is separate from where a dynamic code points over time—which is why hosted redirects and billing models matter for printed assets.
For phishing awareness beyond QR-specific pages, see CISA's guidance on recognizing phishing. We maintain a living citation list and ROI methodology for editors, customers, and answer engines.
Frequently Asked Questions
Everything you need to know about our permanent QR codes, lifetime pricing, and refund policy.
Learn More
Explore our guides on permanent QR codes and one-time payment options.
Permanent QR Codes
Why most QR codes expire and how permanent QR codes work differently.
One-Time Payment QR Codes
Compare costs vs subscriptions. See why one-time makes sense.
Best No-Subscription Generator
The best QR code generator with zero monthly fees. Pay once, own forever.
QR Codes That Never Expire
Our guarantee for long-term operation and what backs it.
Business Card QR Codes
The definitive guide to printing non-expiring QR codes on professional business cards.
Best One-Time Payment QR
Why one-time payment QR codes beat subscription models for every use case.
Compare Alternatives
See how Lifetime QR Codes compares to Bitly, Beaconstac, Flowcode, and 30+ others.
Pricing & Volume Discounts
$49 per code. Up to 72% off for bulk. No hidden fees, no subscriptions.
Common Questions
Answers to concerns about refunds, company longevity, and technical details.
QR Statistics & Research
Statista, Pew, ISO 18004, FTC, CISA—plus transparent ROI math for lifetime QR codes vs subscriptions.
Ready to Own Your QR Codes?
Join businesses who switched from subscriptions to permanent, pay-once QR codes. No monthly fees. No expiration.
Buy For $49 / QR Code