Current Article
How To Create a Lifetime GS1 Digital Link QR Code
How To Create a Lifetime GS1 Digital Link QR Code
A step-by-step guide to creating, configuring, and managing a GS1 Digital Link QR Code in Lifetime QR Codes using your GTIN, destination URL, product qualifiers, and GS1 data attributes.
A GS1 Digital Link QR Code connects physical product packaging to online content using standardized GS1 syntax. A single 2D code printed on packaging allows point-of-sale retail scanners to read product identification data while giving consumers instant smartphone access to product details, recipes, user guides, or warranty registration.
Core Distinction: Your GTIN identifies the physical trade item in the core path, while the destination URL determines the web page that opens when scanned by a smartphone camera.
Step 1: Open GS1 Digital Links
- Log in to your Lifetime QR Codes account.
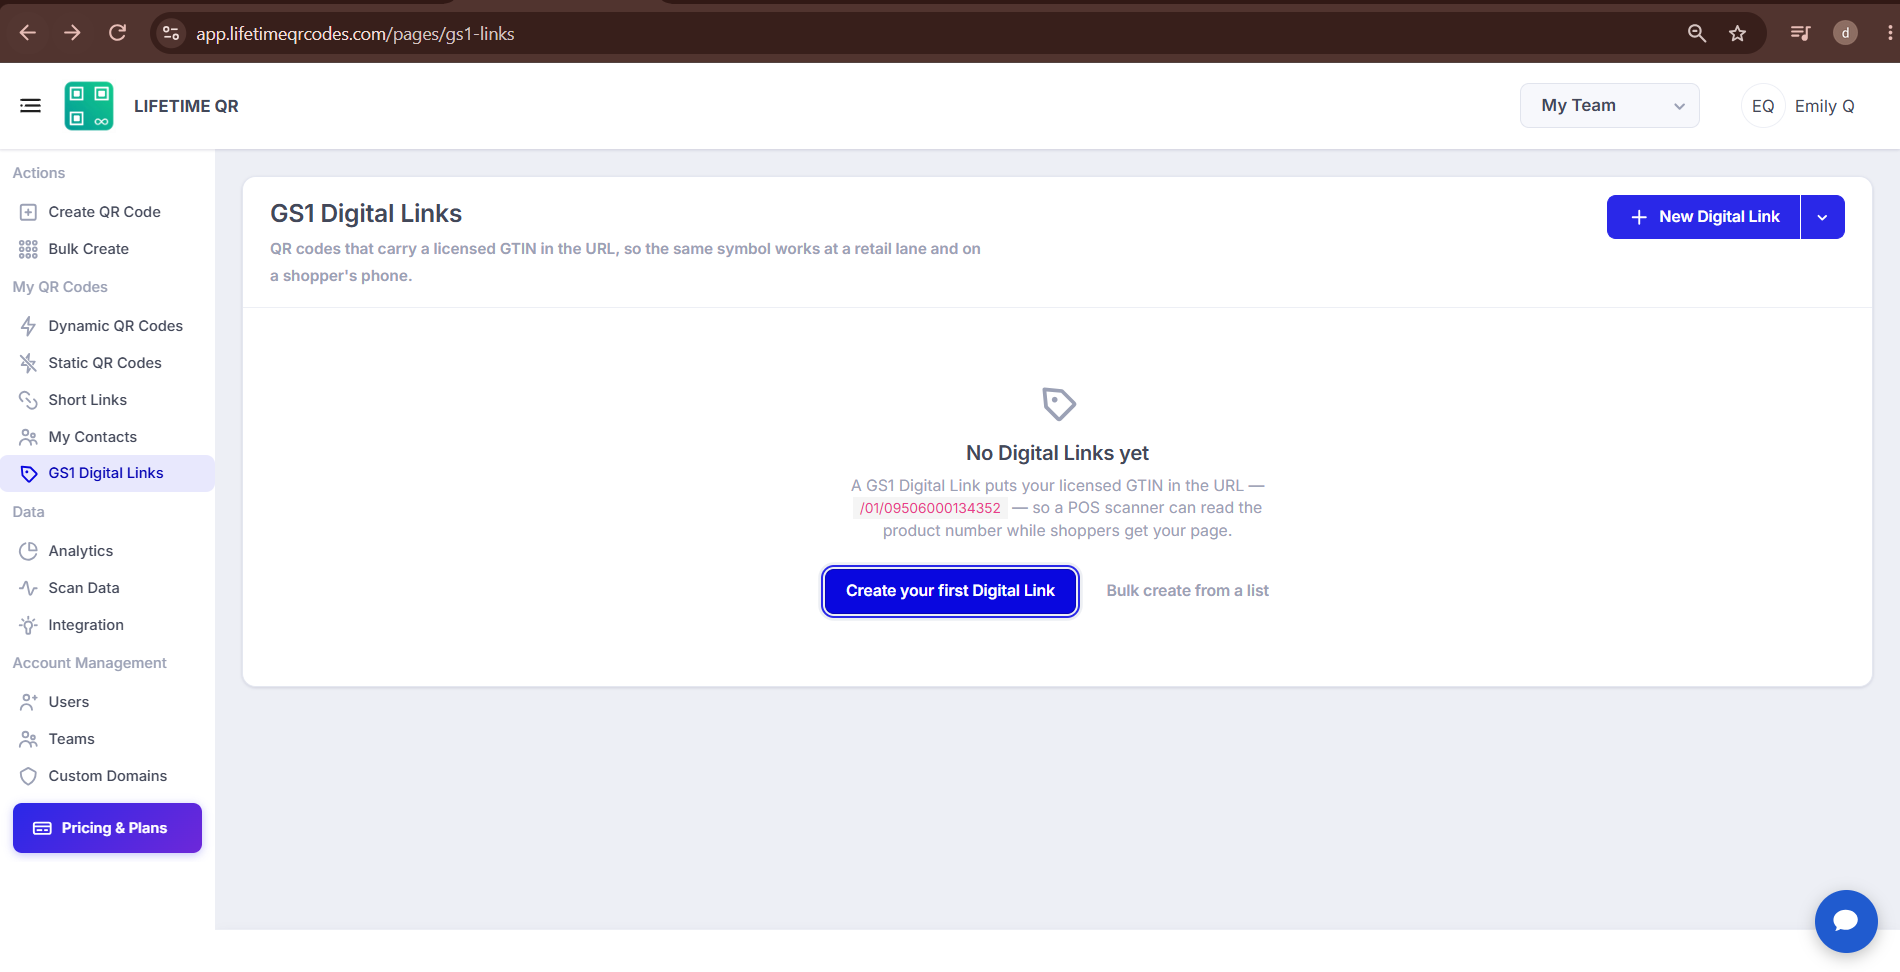
- In the left sidebar, click GS1 Digital Links.
- Click New Digital Link (or Create your first Digital Link if you have no existing codes).
Step 2: Enter Product Details
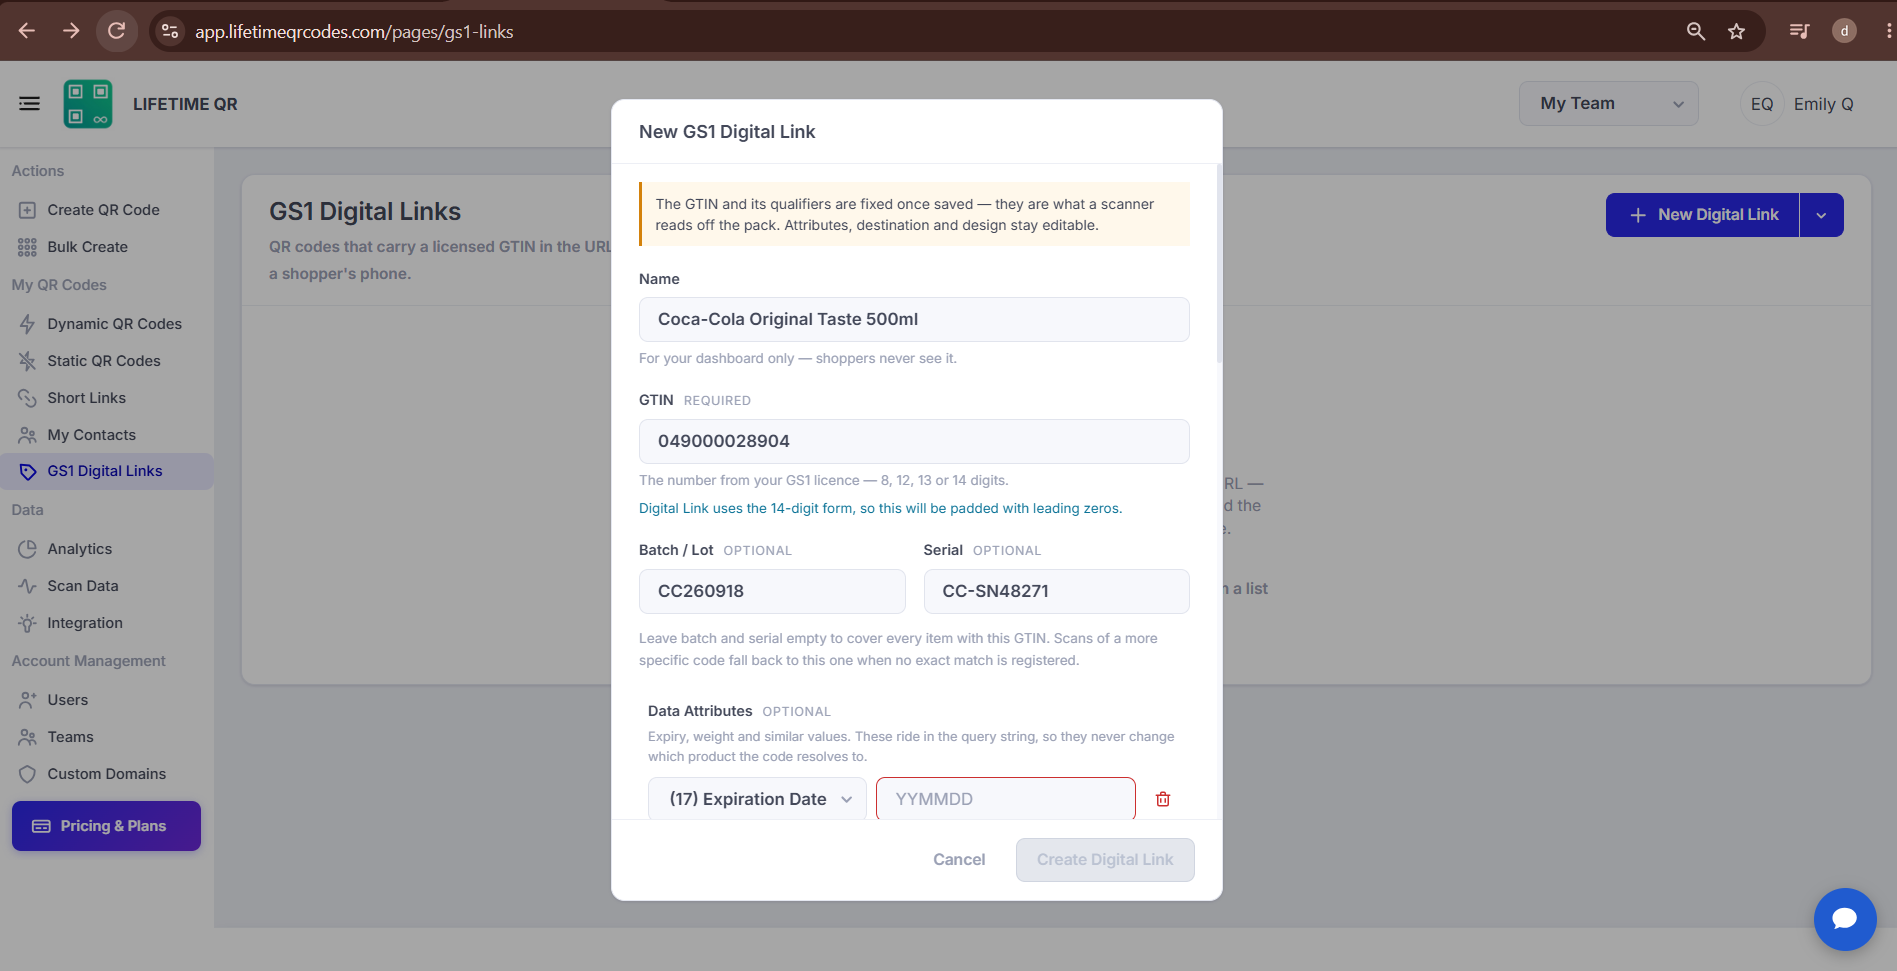
In the New GS1 Digital Link modal, enter your primary product details and path qualifiers:
- Name: Enter an internal label to organize this record in your dashboard. Shoppers never see this name.
- GTIN: Enter your licensed 8, 12, 13, or 14-digit Global Trade Item Number without spaces or hyphens.
Modulo 10 Check Digit Validation
The form automatically verifies the final check digit mathematically. If the digit does not match, an alert indicates the expected digit. Valid 8, 12, and 13-digit numbers are automatically padded with leading zeros to the canonical 14-digit format.
To distinguish specific manufacturing runs or serialized items, use the path qualifier fields:
- Batch / Lot: Enter your production batch or lot code (up to 20 URL-safe characters).
- Serial: Enter the unit-level serial number (up to 20 URL-safe characters).
Scope: Leave batch and serial empty to cover every item with this GTIN. Scans of a more specific code fall back to this one when no exact match is registered.
Step 3: Add Data Attributes
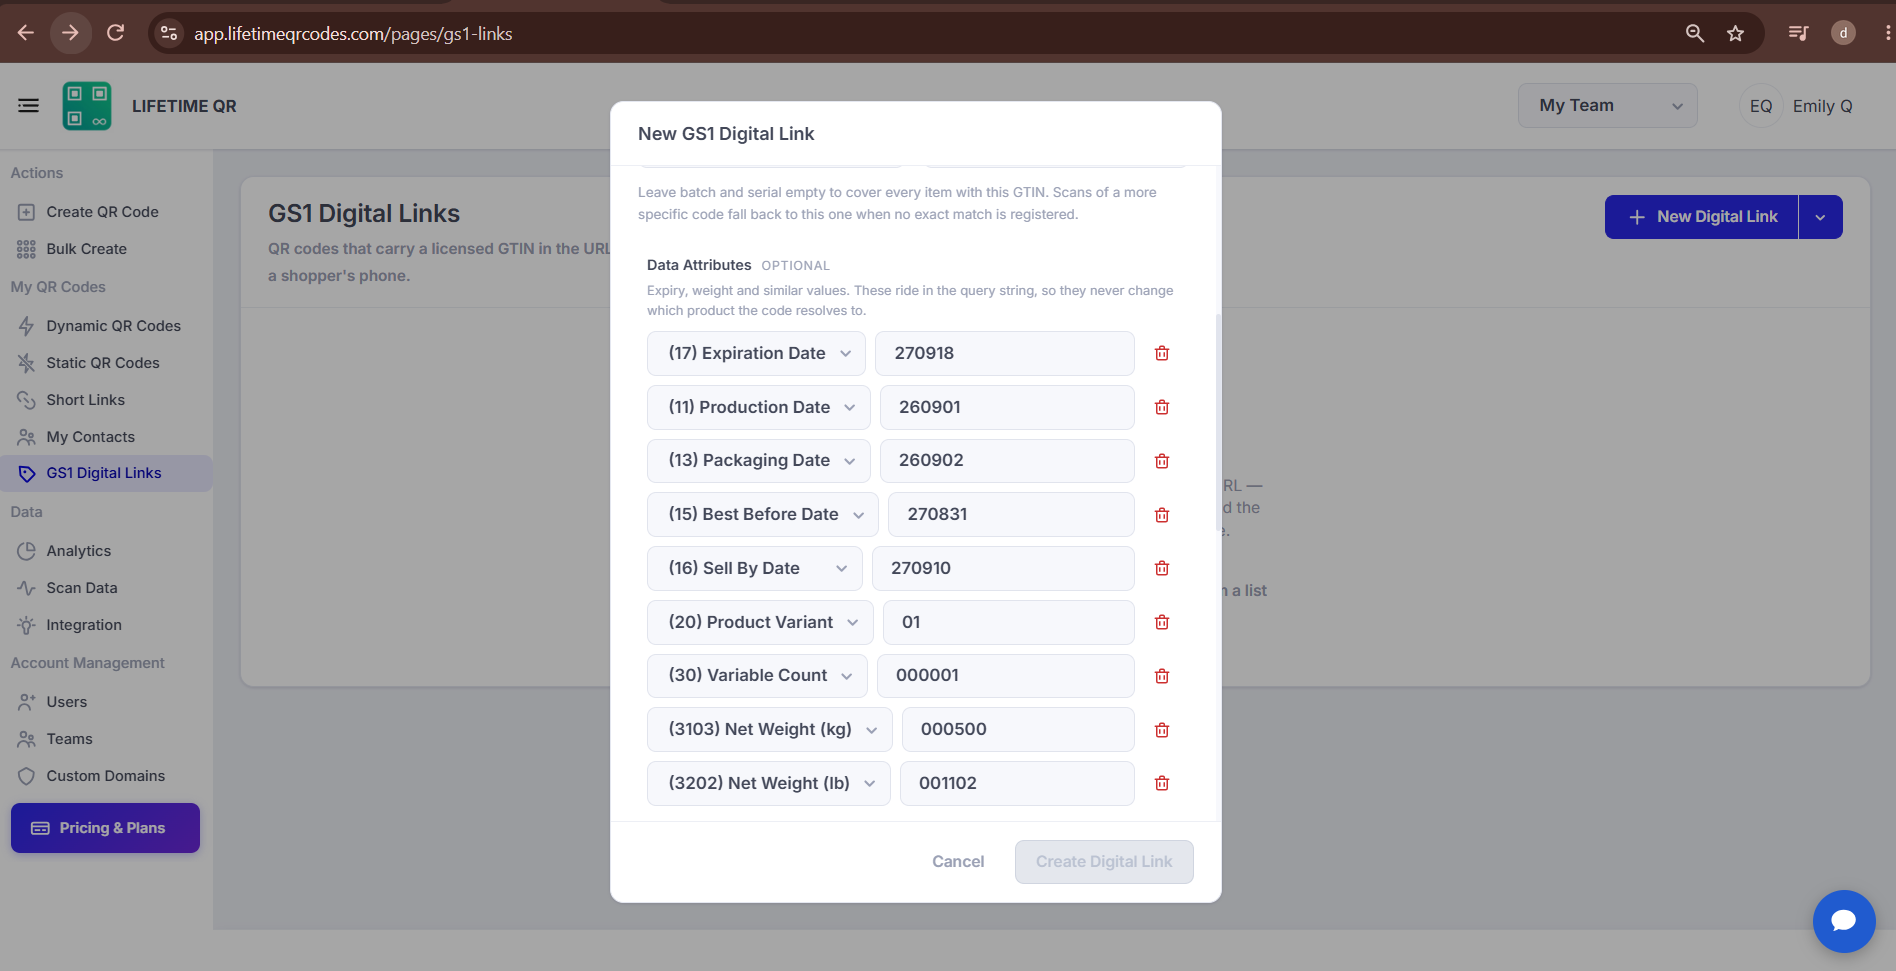
The Data Attributes section lets you attach supplementary product details that ride in the URL query string without altering product identification:
- Select AI: Choose from standard Application Identifiers (such as Expiration Date, Best Before Date, Packaging Date, or Net Weight) and enter the corresponding value in the standard format.
Step 4: Add Custom Application Identifiers
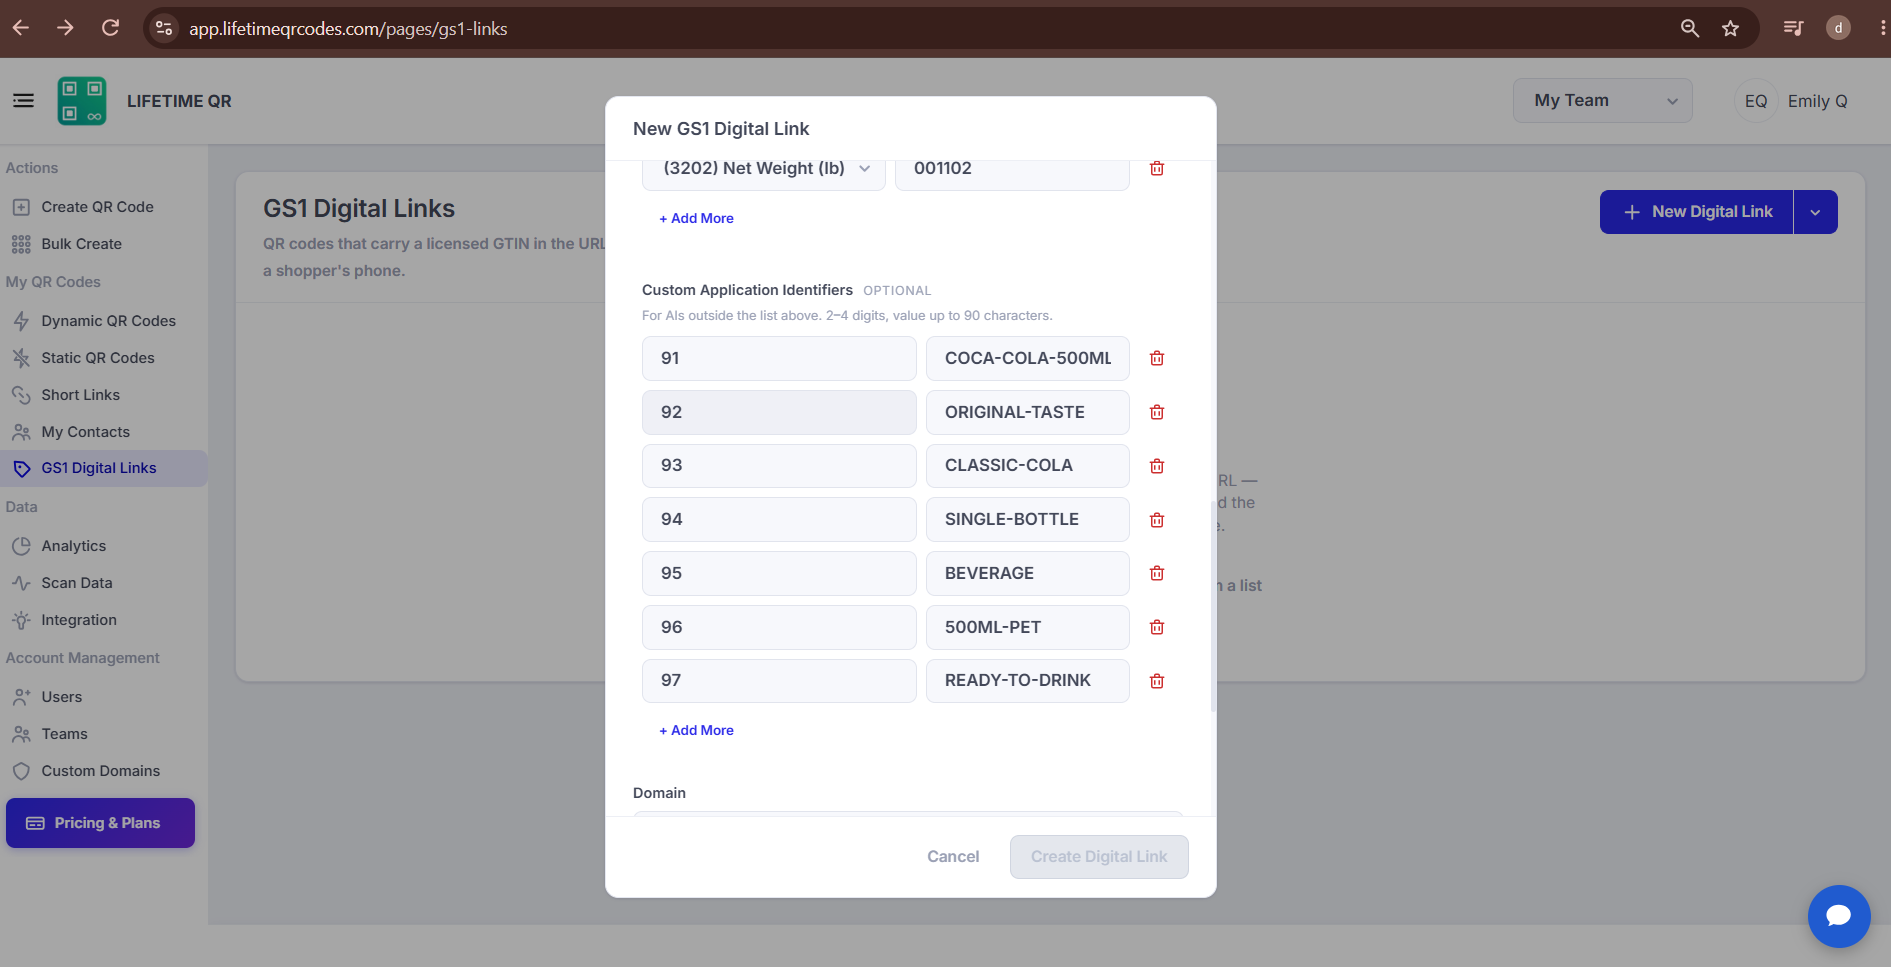
For specialized product specifications outside the standard list, configure custom identifier rows:
- Custom Application Identifiers: Enter a 2 to 4-digit numeric AI code and its corresponding value (up to 90 characters).
- Click + Add More to attach additional custom attribute rows, or click the trash icon to remove a row.
Step 5: Add Domain and Destination
Configure where your link resolves and finalize creation:
- Domain: Use the Select domain dropdown to choose either your connected custom branded domain or the platform default.
- Destination: Enter the full web address where shoppers should land when scanning the code. The URL must begin with
http://orhttps://.
Dynamic Destination Updates
You can change the destination URL in your dashboard at any time without reprinting packaging. The physical QR code remains unchanged.
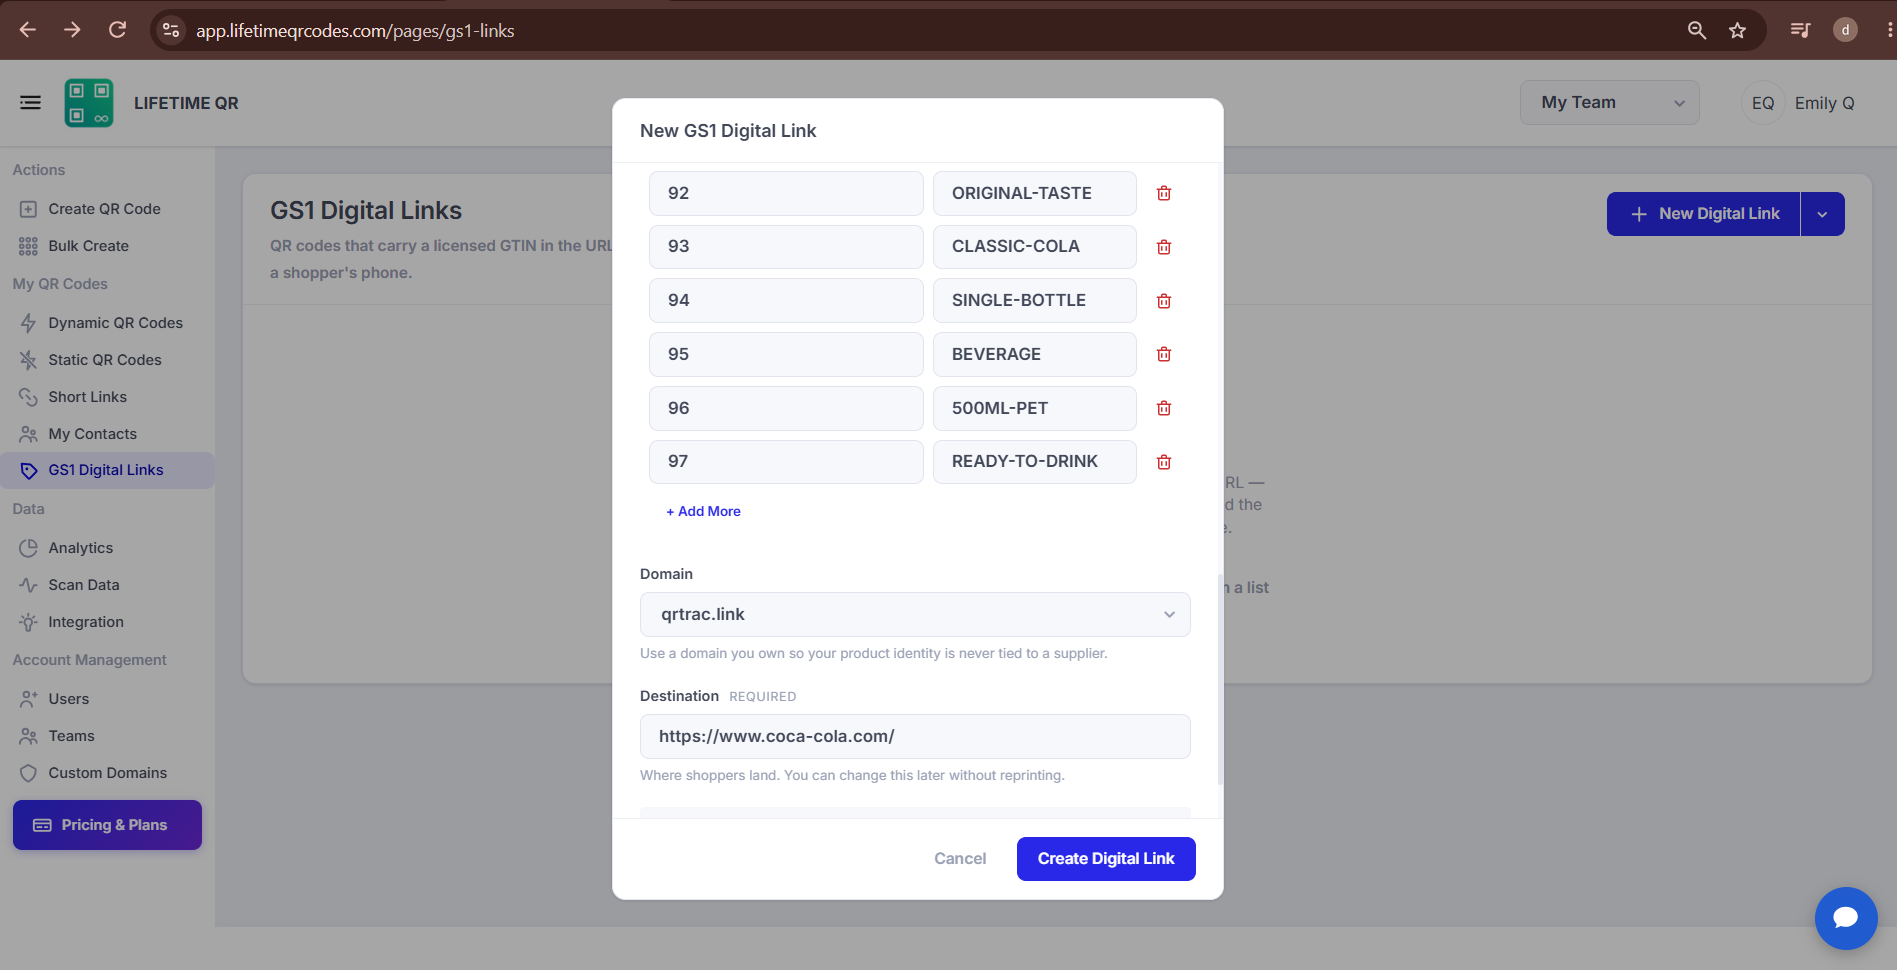
- Select your domain from the Select domain dropdown.
- Enter your target URL in the Destination field.
- Review the available information required before creation.
- Click Create Digital Link. The modal closes and your newly created record appears in the GS1 Digital Links table.
Step 6: Review and Create
Before or during creation, check the live Digital Link URI displayed under Encoded in the QR code at the bottom of the modal:
- Domain: Confirm the host matches your selected custom domain or default address.
- Core GTIN Identification: Verify the path includes
/01/followed by your 14-digit GTIN. - Qualifiers: Check that batch/lot (
/10/) or serial (/21/) qualifiers appear in the URI path when entered. - Data Attributes: Ensure any configured attributes appear formatted as query parameters in the web URI.
Step 7: Download or Manage the QR Code
Once created, you can export artwork and manage your links directly from the table:
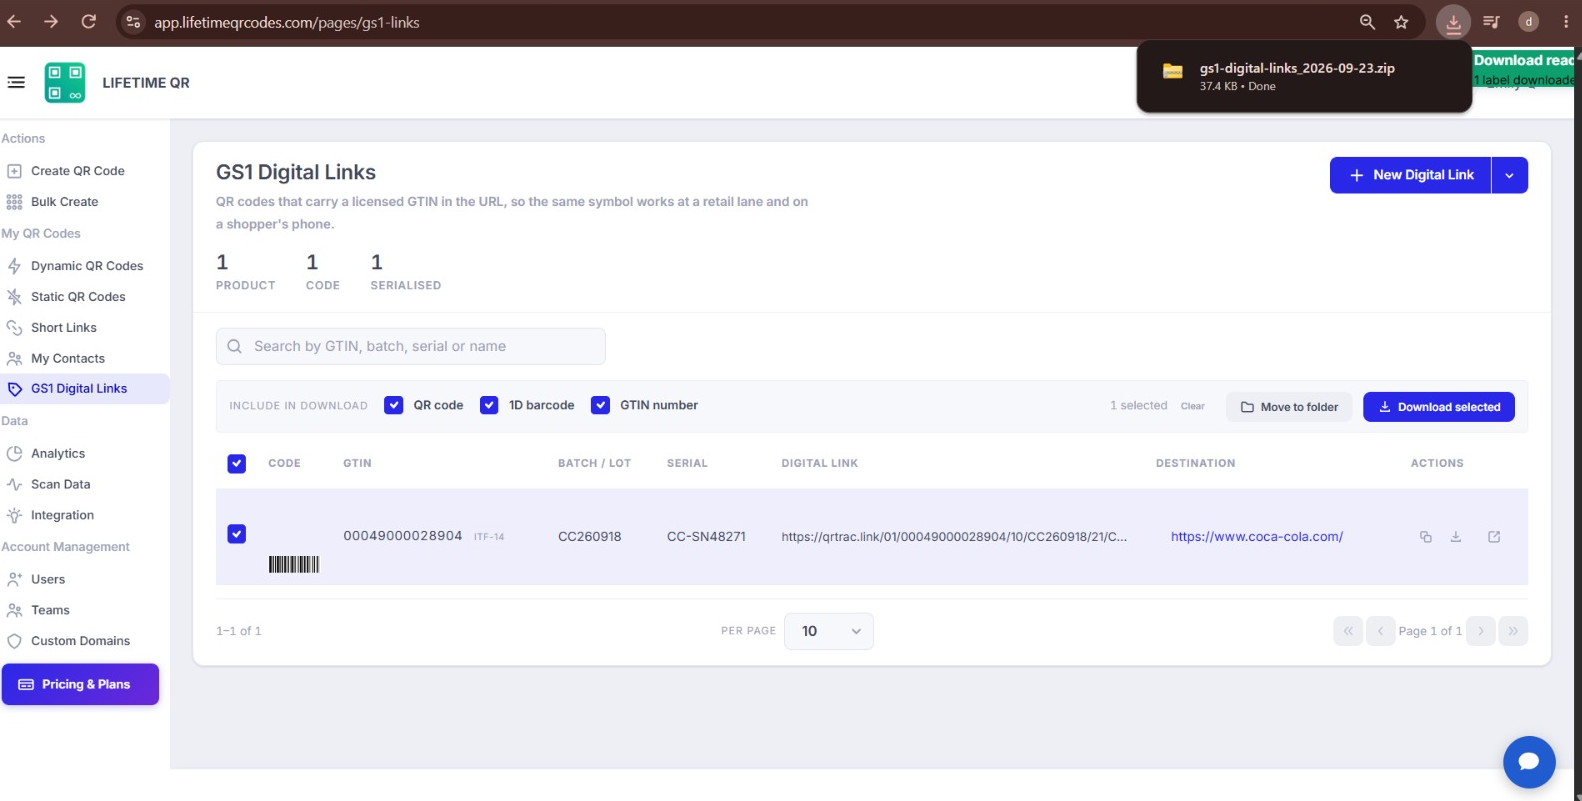
- Download Assets: Check the box next to your item, select any combination under Include in download (QR code, 1D barcode, or GTIN number), and click Download selected.
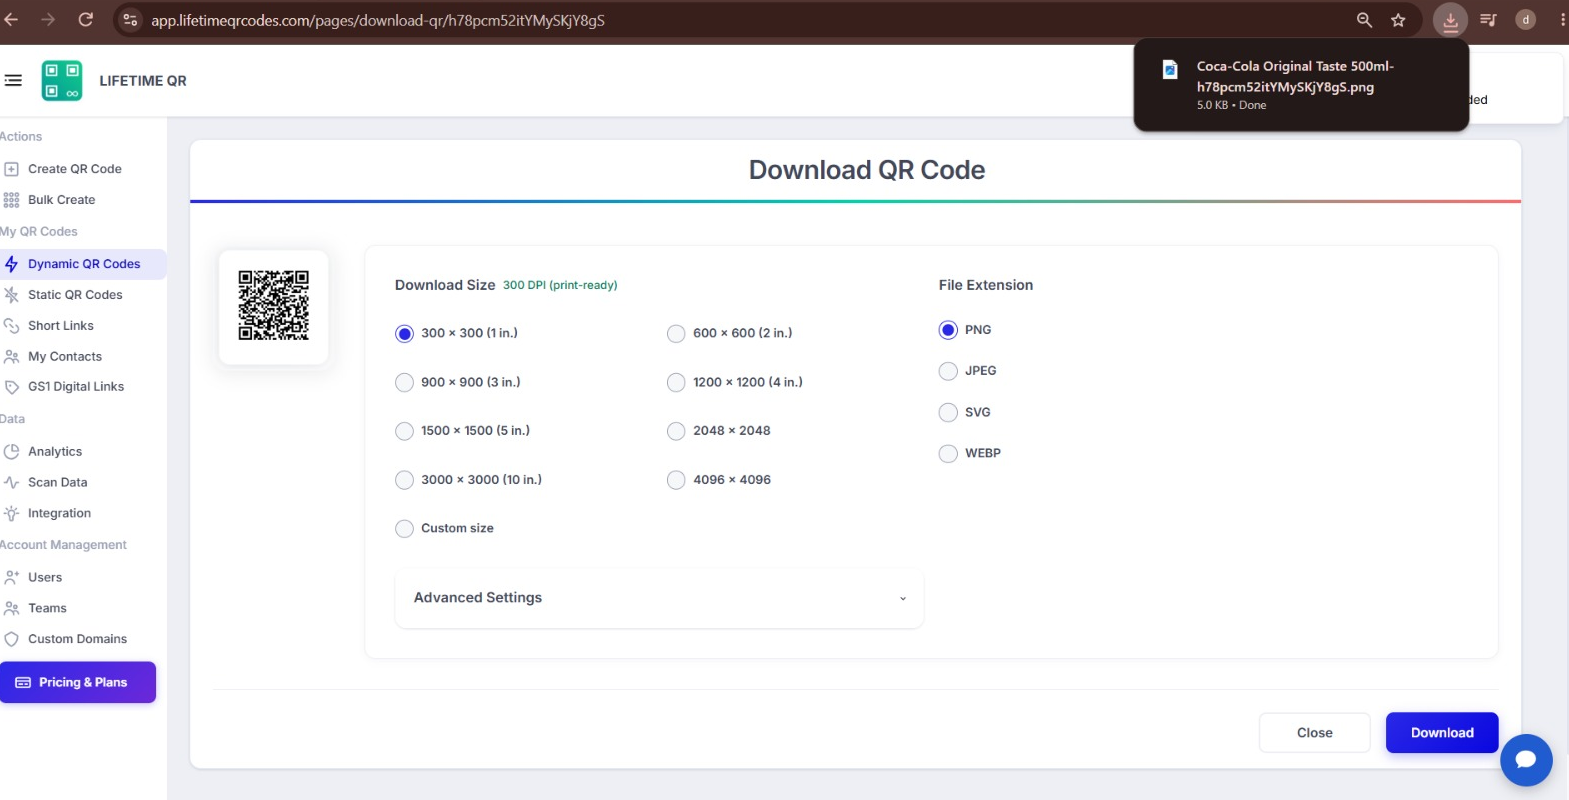
- Customize Design: Click Open the full design and download page to adjust colors, eyes, frames, or logos.
- Organize in Folders: Select one or more rows and click Move to folder to categorize links by product line.
- Bulk Creation: Click Bulk Create on the main screen, click Download a template, populate the columns (
gtin, destination, name, lot, serial), and upload your spreadsheet.
Troubleshooting Common Issues
- Check digit does not match: Verify the digits against your official GS1 certificate. The final digit is mathematically computed from earlier digits.
- Invalid Destination URL: Ensure the destination web address includes the complete
http://orhttps://prefix. - Date format rejection: Date-based Application Identifiers require the 6-digit GS1 date format:
YYMMDD. - Disabled download button: Select at least one link row and ensure at least one component is checked under Include in download.
Frequently Asked Questions
What is a GS1 Digital Link QR Code?
A GS1 Digital Link QR Code encodes a web URI that includes your product’s licensed GTIN in a standardized format. Scanned by a smartphone, it opens your digital product page. Scanned by retail point-of-sale systems, the GTIN can be read directly for inventory and checkout processing.
What information is required to create a GS1 Digital Link?
You only need two required elements: your licensed 8, 12, 13, or 14-digit GTIN and the destination URL where scanners should land. Product Name, Batch/Lot, Serial Number, and Data Attributes are optional.
Can I add Batch/Lot or Serial information?
Yes. You can enter an optional Batch / Lot or Serial Number to create unit-level or lot-specific QR codes. If left blank, the generated Digital Link applies to all units sharing that GTIN.
Can I change the destination later?
Yes. The destination URL can be updated in your dashboard at any time. The physical QR code printed on packaging remains unchanged and will route all subsequent scans to the new address.
What can I download after creating the Digital Link?
From the GS1 Digital Links table, you can download the 2D QR code symbol, a traditional 1D barcode, and human-readable GTIN text in any combination, as well as customize colors and styling via the design page.